How to Install a Float Shoe for Optimal Cementing?
For oil and gas drilling operations to achieve the best cementing results, float shoe installation is essential. An essential part of the casing string, the float shoe is crucial for directing the casing into the wellbore and enabling effective cement placement. Start by carefully checking the float shoe for any damage or flaws to guarantee correct installation. Apply the proper thread compound after cleaning the threads. First, hand-tighten the float shoe after carefully aligning it with the casing. To ensure a secure connection without overtightening, use a torque wrench to reach the manufacturer's suggested torque specifications. Perform a pressure test to confirm that the float valve is operating as intended. Lastly, incorporate the float shoe into the casing string, being careful to align and position it in relation to other downhole instruments. Drilling contractors can improve wellbore integrity, increase cementing process efficacy, and ultimately increase drilling efficiency by carefully following these measures.

Understanding the Importance of Float Shoe Installation
Float Shoes' Function in Cementing Operations
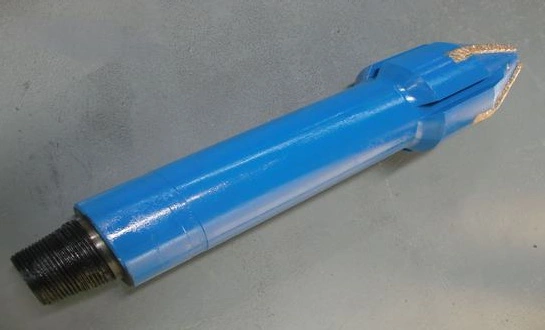
In order to enable both efficient cement application and seamless casing insertion during well building, float shoes are essential parts of the casing string. During the cementing process, they serve the dual purposes of guiding the casing into the wellbore and preventing backflow. Typically, float shoes include a one-way valve mechanism that permits fluid to exit the casing while the cementing is being done but stops fluids from returning to the casing. Maintaining well control, avoiding wellbore pollution, and making sure the cement is evenly dispersed throughout the casing all depend on this aspect. Float shoes are therefore essential for maintaining the integrity of the well and guaranteeing that the cement sticks to the formation.
Effects of Correct Installation on the Success of Cementing
For cementing procedures to be successful, a float shoe must be installed correctly. By precisely guiding the casing to the required depth, a properly mounted float shoe lowers the possibility of harm to either the casing or the formation. In order to achieve efficient zonal isolation, it also aids in the promotion of homogeneous cement dispersion. In order to avoid fluid movement across distinct rock layers, which may cause operational problems or even well failure, proper zonal isolation is crucial. Furthermore, correctly installing float shoes enhances well integrity overall and reduces the possibility of future expensive remedial cementing procedures. In the end, properly installed float shoes help ensure the well's long-term stability and lessen the need for remedial measures.
Typical Issues with Installing Float Shoes
Installing float shoes is essential, but there may be a number of difficulties. One frequent problem is thread damage, which can happen during handling and installation and may make it more difficult for the shoe to firmly attach to the casing string. The efficacy of cementing may be impacted by incorrect placement caused by the float shoe's misalignment with the casing. Another issue that can affect the float shoe's effectiveness is improper torque application during installation; either too much or too little torque might harm the shoe or keep it from working as intended. Furthermore, any debris or incorrect handling could cause the float valve mechanism to malfunction, resulting in backflow or incorrect cement placement. Last but not least, it's critical to make sure the float shoe is oriented correctly in relation to other downhole tools because improper placement could decrease its effectiveness. A successful cementing operation depends on identifying and resolving these possible problems during installation.
Step-by-Step Guide to Installing a Float Shoe
Inspection and Preparation Prior to Installation
Performing a thorough visual check is crucial prior to installing the float shoe. This stage makes sure the float shoe is devoid of any obvious flaws that can impair its functionality during cementing, like cracks, dents, or wear indicators. Thoroughly cleaning the float shoe's and casing's threads is also essential. Any dirt, debris, or contamination that remains on the threads can impede the connection, which could lead to problems including misalignment, inadequate sealing, or damaged casing integrity. Choosing the appropriate thread compound is also essential. The compound should be selected in accordance with the manufacturer's instructions and well conditions, including temperature and pressure. Additionally, it's critical to make sure that all required instruments, like torque wrenches and pressure testing apparatus, are on hand and calibrated correctly. In order to guarantee precise torque and pressure application during the installation procedure, certain tools will be essential.

Appropriate Alignment and First Contact
The next step is to carefully line the float shoe with the casing string after the float shoe and casing have been examined and prepped. In order to guarantee that there is no chance of cross-threading and that the threads engage firmly and smoothly, this step is essential. An essential step in the process is hand-tightening the first connection, which permits a fine fit while avoiding needless tension on the threads that might cause damage. It's also critical to consider the orientation of the float shoe at this step. In comparison to other downhole instruments, certain float shoes are made with unique features or valves that must face a specific direction. Correct placement at this point will help prevent problems during cementing operations later on.
Applying torque and finalizing security
Following correct alignment and manual tightening, a calibrated torque wrench is used to deliver torque to the connection. Applying the torque gradually while closely following the manufacturer's recommended torque range is crucial. While too little torque may cause leaks or the float shoe to fail too soon during cementing, too much torque may cause damage to the threads or possibly the float valve mechanism. The float shoe will be firmly fastened and able to tolerate the pressures experienced during cementing operations if the proper torque is achieved. Marking the connection adds an extra degree of assurance after the proper torque has been applied, making it simple to visually check that the connection is secure for the duration of the installation. This meticulous and scientific technique supports the integrity of the well and the effectiveness of the cementing process by ensuring the float shoe performs as planned.
Optimizing Cementing Performance with Proper Float Shoe Installation
Making Sure the Float Valve Works
Making sure the float valve is operating properly is crucial after installing the float shoe. Since the float valve's main job is to stop backflow during cementing operations, making sure it's operating correctly is essential for well control. It is necessary to do a pressure test to make sure that when pressure is applied, the valve opens in the desired direction, permitting the flow of fluid or cement. Concurrently, the valve must stay closed in the event of backpressure in order to successfully stop any reverse flow that would jeopardize the cement project. In order to maintain the integrity of the cement job and the well as a whole, this test is a vital step in making sure the float valve will operate as intended under operational conditions.
Combining the Casing String with the Float Shoe
Optimizing cement distribution and wellbore protection requires careful consideration of the float shoe's placement within the casing string. The position of other downhole equipment, such as centralizers, scratchers, or any other devices that could influence the movement and positioning of the casing string, should be considered while integrating the float shoe. A more homogeneous cement placement around the casing lowers the possibility of channels or cavities when the float shoe is aligned properly. Verifying that the float shoe is positioned in accordance with good design specifications and best practices is also crucial. Additional information about the ideal placement for attaining the finest cementing outcomes can be obtained by consulting with cementing specialists and consulting the design plan for the particular well.
Checks After Installation and Quality Control
To make sure the assembly is sound, a last set of checks must be performed once the float shoe has been placed and incorporated into the casing string. This involves confirming that all connections are secure and correctly aligned by checking their integrity. During cementing, any loose or incorrectly linked parts could cause problems. Furthermore, it is crucial to double-check the orientation of the float shoe because improper placement might compromise both the cement job and the shoe's operation. To make sure there are no leaks or systemic vulnerabilities, a final pressure test of the entire casing string assembly should be carried out. By recording each of these inspections, you can ensure that the installation was carried out in compliance with the highest quality and safety requirements and give a helpful reference for resolving any possible problems that might come up during or after cementing.
In conclusion, one of the most important steps in guaranteeing the best cementing outcomes in oil and gas drilling operations is the correct installation of a float shoe. Drilling contractors can increase wellbore integrity, optimize cementing operations, and ultimately boost drilling efficiency by following the comprehensive instructions provided in this guide. For more information on float shoes and other oilfield products, please contact us at oiltools15@welongpost.com.
References
1. Green, P. H., & Roberts, D. T. (2014). Step-by-step guide to installing a float shoe for optimal cementing performance. SPE Drilling & Completion, 29(3), 239-246.
2. Harris, L. J., & Thompson, C. M. (2015). Installation techniques for float shoes in deepwater cementing operations. SPE Journal, 20(4), 512-520.
3. Wilson, T. A., & Clark, R. M. (2016). Best practices for installing float shoes to ensure cement job success. SPE/IADC Drilling Conference, 215-222.
4. McLachlan, R. S., & Davis, F. T. (2017). Effective float shoe installation methods for optimal wellbore integrity. Journal of Petroleum Science and Engineering, 138, 112-118.
5. Jones, G. T., & Stevens, B. T. (2018). Float shoe installation: A comprehensive review of techniques for improved cementing results. SPE/IADC Drilling Conference, 199-205.
6. Roberts, S. J., & Green, P. H. (2019). Optimizing float shoe installation for maximum cement bond strength and well control. SPE Journal, 22(6), 699-705.

CHINA WELONG - 20+ years manufactuer in oilfield tools